 Now you can smelt gold concentrates Now you can smelt gold concentrates
(and old jewelry)
in an ordinary microwave oven!!!
Whether you are a Serious Prospector or, a Weekend Enthusiast, this NEW Microwave Gold Concentrate Kiln Processing Kit is made
JUST FOR YOU !!
All you need is a 1200 watt Microwave Oven,
a few Tools … and ….
You on your way to SMELTING !!
Deluxe Kiln Kit $369
Microwave Gold Kiln Kit
Much research and experimentation has gone into the design of this kiln, to ensure the best results for separating fine gold from black sand concentrates. The stacked or layered design allows for replacement of damaged pieces, in the event of spills, while two shorter top layers enable the kiln to be stacked to different heights, according to the size (height) crucible used.
Advantages
 • Variable kiln heights possible, for crucibles of different heights • Variable kiln heights possible, for crucibles of different heights
• Replaceable parts
• Simpler process
• Less expensive
• Less tedious
• More fun
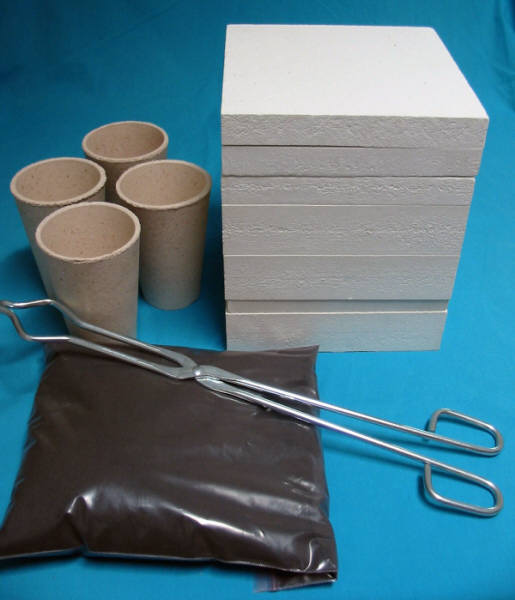
GPK Kit Includes
• A versatile kiln consisting of layers of rigidized HD ceramic fiberboard capable of withstanding temperatures of over 2300 degrees Fahrenheit without warping or cracking
• One kiln shelf
• Five pounds of custom mixed flux
• One pair of 18” scissor tongs, for lifting hot crucibles and pouring molten material
• (4) 40 gram “one shot” clay crucibles
• Detailed instruction booklet
ADDITIONAL MATERIALS NEEDED
(Not included in Kit)
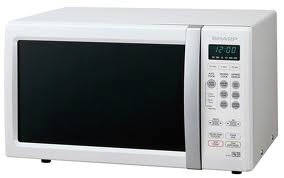 • 1200 watt microwave with turntable removed. The microwave must have at least 10” inside clearance height. • 1200 watt microwave with turntable removed. The microwave must have at least 10” inside clearance height.
• Heat proof gloves – welding type gloves are recommended
• Welder’s leather apron
• Dust respirator mask
• Clear safety goggles
• 12” x 12” clay tiles
• Cast iron conical mold
READ ALL INSTRUCTIONS THOROUGHLY
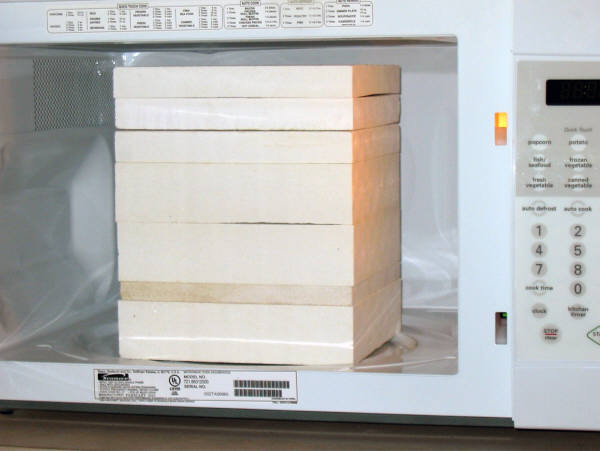
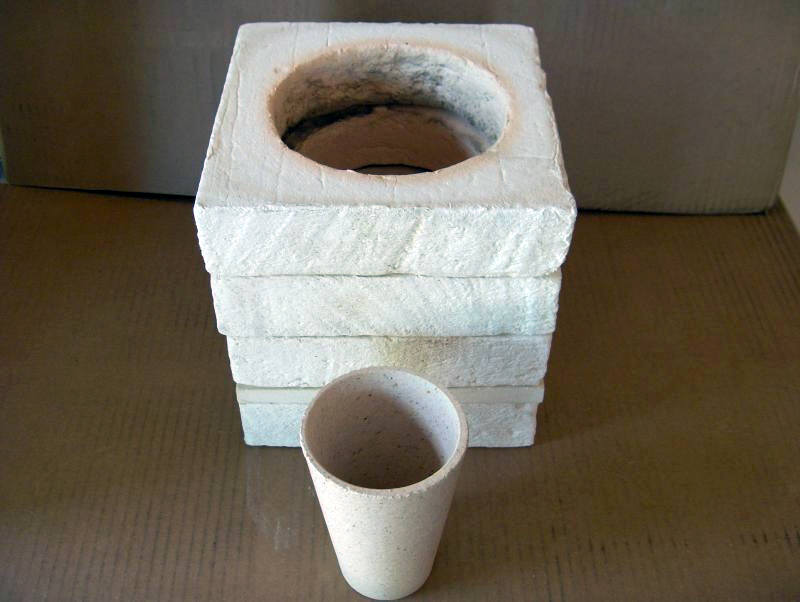 Beginning at the bottom, start with one 2” hollow 8” x 8” square of kiln insulating material. Center the provided 8” x 8” ceramic square kiln shelf on top of it. Center an empty crucible on the kiln shelf. Stack the remaining 2” and 1” hollow kiln squares around the crucible high enough to provide approximately 1” of clearance over the top of the crucible. Place the 1” solid kiln square on top and make sure all pieces are aligned with each other and that the crucible is in the center of it. The 2” and 1” hollow kiln squares allow you to stack the kiln to accommodate any height of crucible you ultimately choose to use in the kiln, as well as the kiln filing inside the microwave. The kiln acts as a thermal insulator to prevent the microwave from being damaged and overheating during the process. The crucible inside the kiln will ultimately reach temperatures in excess of 2300 degrees Fahrenheit during the firing process and those temperatures are not exactly “microwave friendly”. Beginning at the bottom, start with one 2” hollow 8” x 8” square of kiln insulating material. Center the provided 8” x 8” ceramic square kiln shelf on top of it. Center an empty crucible on the kiln shelf. Stack the remaining 2” and 1” hollow kiln squares around the crucible high enough to provide approximately 1” of clearance over the top of the crucible. Place the 1” solid kiln square on top and make sure all pieces are aligned with each other and that the crucible is in the center of it. The 2” and 1” hollow kiln squares allow you to stack the kiln to accommodate any height of crucible you ultimately choose to use in the kiln, as well as the kiln filing inside the microwave. The kiln acts as a thermal insulator to prevent the microwave from being damaged and overheating during the process. The crucible inside the kiln will ultimately reach temperatures in excess of 2300 degrees Fahrenheit during the firing process and those temperatures are not exactly “microwave friendly”.
“SEASONING” THE KILN & CRUCIBLE PRIOR TO USE
 Place the stacked kiln, containing an empty crucible, into the microwave and set the timer for 15 minutes on high. At the end of the 15 minute cycle, remove the kiln from the microwave and allow the kiln and crucible to cool to ambient temperature. Repeat the process again, setting the timer for 15 minutes. This process will drive off any moisture absorbed by the kiln, kiln shelf and/or the crucible from the atmosphere. New crucibles should also be “seasoned” using the above method for 15 minutes before use as well. Moisture absorbed from the atmosphere can cause the crucibles and or kiln shelf to crack or break during the firing process if not “seasoned” properly prior to use. It’s a good practice to repeat the “seasoning” process after extended periods of non-use of the kiln prior to firing. You’ve got a lot of time and effort invested in your black sands concentrates, so don’t get in a hurry and skip this “seasoning” process. Place the stacked kiln, containing an empty crucible, into the microwave and set the timer for 15 minutes on high. At the end of the 15 minute cycle, remove the kiln from the microwave and allow the kiln and crucible to cool to ambient temperature. Repeat the process again, setting the timer for 15 minutes. This process will drive off any moisture absorbed by the kiln, kiln shelf and/or the crucible from the atmosphere. New crucibles should also be “seasoned” using the above method for 15 minutes before use as well. Moisture absorbed from the atmosphere can cause the crucibles and or kiln shelf to crack or break during the firing process if not “seasoned” properly prior to use. It’s a good practice to repeat the “seasoning” process after extended periods of non-use of the kiln prior to firing. You’ve got a lot of time and effort invested in your black sands concentrates, so don’t get in a hurry and skip this “seasoning” process.
CHARGING THE CRUCIBLE
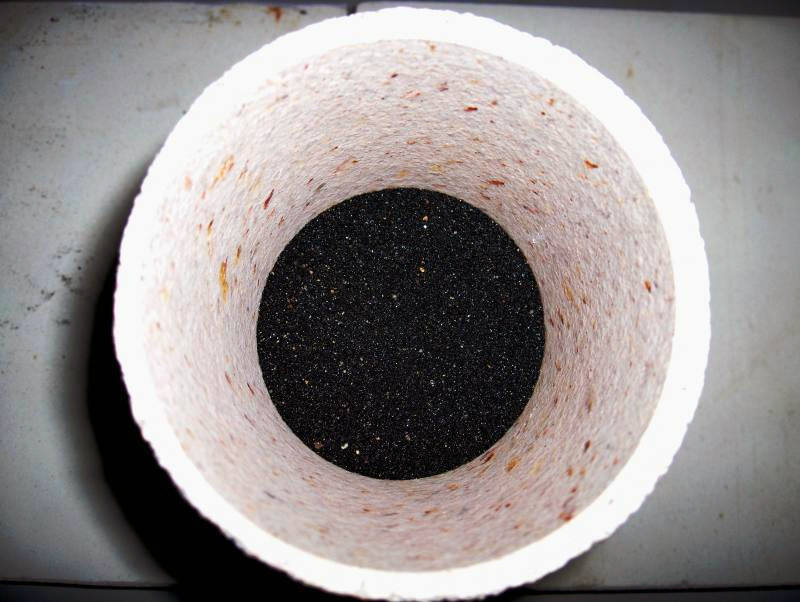 Place 3 parts flux to 1 part of your dry black sand concentrates into a quart jar. Place the lid on the jar and roll the jar until the materials are thoroughly mixed and homogenous. Pour the mixture into the crucible, leaving an inch space from the top of the crucible. Never pack a crucible with the mixture or use wet or damp black sand concentrate, as the material can rapidly expand upon heating and can crack the crucible or spill over the top. Lesser amounts of the black sands and flux mixture will work just as well as filling the whole crucible. If, in your experience after firing, the flux is thick and viscous and doesn’t want to pour readily using the 3 to 1 mixture, you can increase the mixture to 4 parts flux to 1 part black sand concentrate or 5 to 1 and it will thin out the flux and make pouring easier. Your experience will ultimately determine the best ratios for your concentrates. Remember, the more fine gold contained in your black sands concentrates, the bigger the button will be and the better the process works. Keep the nuggets and pickers out of your black sand concentrates and smelt the rest - this is my policy. Place 3 parts flux to 1 part of your dry black sand concentrates into a quart jar. Place the lid on the jar and roll the jar until the materials are thoroughly mixed and homogenous. Pour the mixture into the crucible, leaving an inch space from the top of the crucible. Never pack a crucible with the mixture or use wet or damp black sand concentrate, as the material can rapidly expand upon heating and can crack the crucible or spill over the top. Lesser amounts of the black sands and flux mixture will work just as well as filling the whole crucible. If, in your experience after firing, the flux is thick and viscous and doesn’t want to pour readily using the 3 to 1 mixture, you can increase the mixture to 4 parts flux to 1 part black sand concentrate or 5 to 1 and it will thin out the flux and make pouring easier. Your experience will ultimately determine the best ratios for your concentrates. Remember, the more fine gold contained in your black sands concentrates, the bigger the button will be and the better the process works. Keep the nuggets and pickers out of your black sand concentrates and smelt the rest - this is my policy.
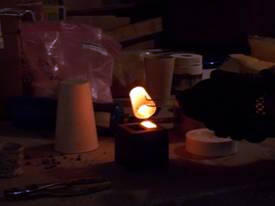
FIRING THE KILN
Place the charged crucible on top of the kiln shelf in the center of the shelf. Stack the hollow kiln squares around the crucible, centering them around it so that the crucible does not touch the kiln and there is approximately 1 inch of clearance between the lid and the top of the crucible. Place the 1” thick solid kiln square lid on the top of the kiln. Carefully set the kiln inside the microwave, centering it in the microwave. Close the microwave door tightly and 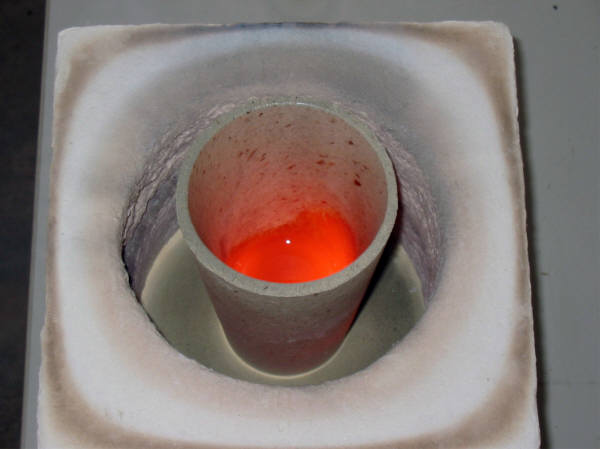 gently - do not slam. Set the microwave power level on high and the timer for 30 to 45 minutes and start the microwave. During the microwaving process DO NOT peer into the microwaves’ window to see what’s going on inside the microwave. Temperatures inside the kiln are going to reach in excess of 2300 degrees Fahrenheit and you don’t want your face in front of the glass door if the crucible fractures, boils over, or the kiln shelf cracks. Give this process of microwave smelting the respect it deserves and BE SAFE this process is not a toy. gently - do not slam. Set the microwave power level on high and the timer for 30 to 45 minutes and start the microwave. During the microwaving process DO NOT peer into the microwaves’ window to see what’s going on inside the microwave. Temperatures inside the kiln are going to reach in excess of 2300 degrees Fahrenheit and you don’t want your face in front of the glass door if the crucible fractures, boils over, or the kiln shelf cracks. Give this process of microwave smelting the respect it deserves and BE SAFE this process is not a toy.
After 30 minutes, open the microwave door and, wearing heat proof gloves, safety glasses and apron, carefully lift the entire kiln out, holding it by the base. Hold the kiln with both hands when moving from microwave to heat-resistant surface. The kiln shelf will be very hot, so be sure to use caution here. Place the hot kiln on a heat-resistant surface. A 12” x 12” clay tile will work well. Carefully lift the lid to check the color of the crucible and contents. They should be glowing yellow-orange. If they are not, replace the lid and return the kiln and contents to the microwave and continue microwaving for an additional 10 minutes. Typical microwaving times are from 30 to 45 minutes depending upon the microwave you are using. Again,remove the hot kiln and place on a heat-proof surface. Lift the lid again carefully.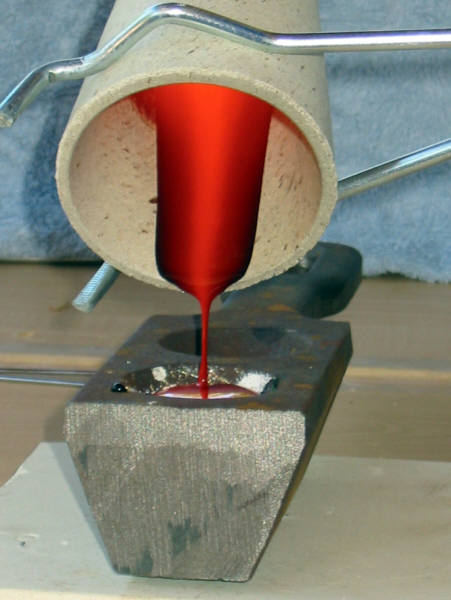 Assuming that the crucible and contents are glowing yellow-orange by now, completely remove the lid with one or two layers of the kiln and place on another 12” x 12” tile or heat proof surface. This allows for access to the heated crucible. Grasp the crucible with the tongs and pour the contents of the crucible into the conical mold. Assuming that the crucible and contents are glowing yellow-orange by now, completely remove the lid with one or two layers of the kiln and place on another 12” x 12” tile or heat proof surface. This allows for access to the heated crucible. Grasp the crucible with the tongs and pour the contents of the crucible into the conical mold.
USE EXTREME CAUTION when pouring the molten material from the crucible into the cast iron mold. The mold must be preheated in an oven or on top of a stove burner to prevent the molten glass and metal from splattering and erupting like a miniature volcano. The best way to pour into the molds is to pour a very small amount first, wait a half second, then pour the rest of the material into the mold. Remember to Pre-heat your mold and drive off any moisture before pouring your crucible contents into the mold. Trust me; you don’t want liquid 2300 degree metal and glass splattering all over you or anything near you.
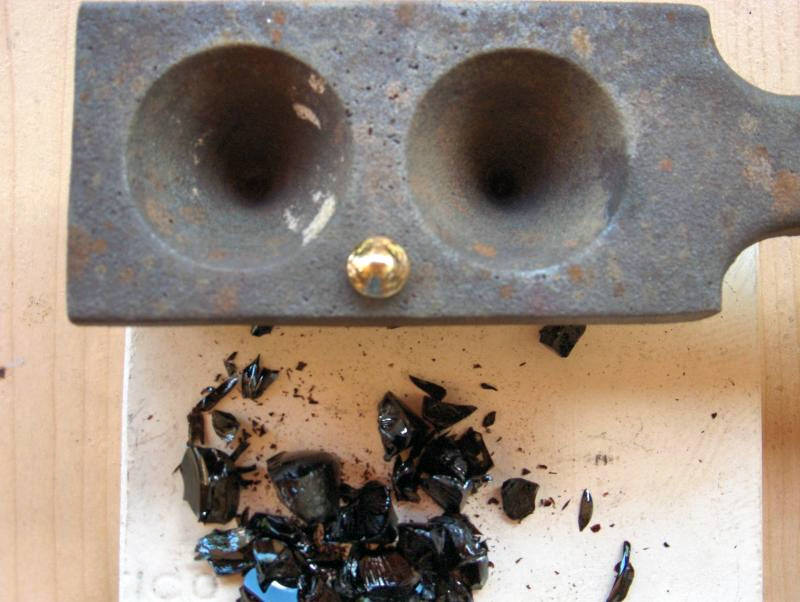
CAST IRON CONICAL MOLD
I place the cast iron conical mold on a 16”x16”x1” clay type “paver stone” used for walkways prior to pouring the molten material into the mold. This provides a good fireproof surface for the mold to sit on and a place to set the hot crucible onto after you have poured the molten material into the mold. This is also a good fireproof surface, should you happen to spill any of the molten material during the pouring process, or overflow the mold itself with the molten flux. Remember that the 2300 degree plus liquid, if spilled onto a wooden bench, will immediately result in the bench bursting into flames, as will the crucible after pouring, if set upon any unprotected surface. At least have the fire department’s number handy if you choose to skip this advice.
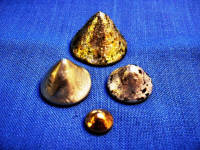
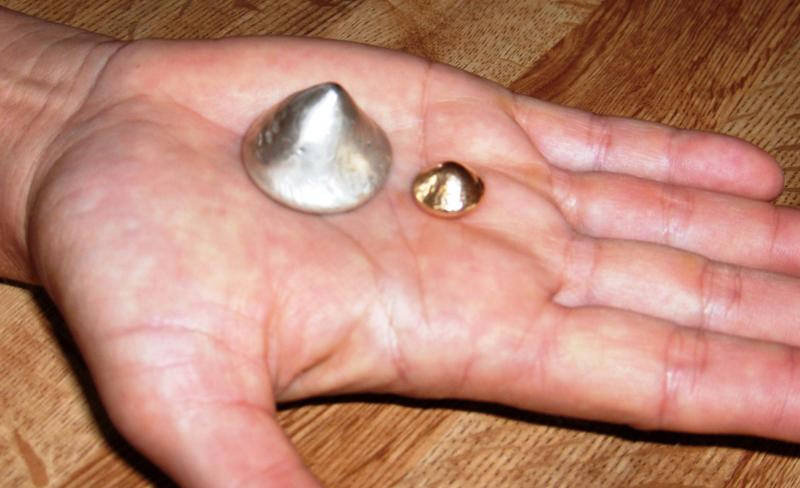
BUTTONS
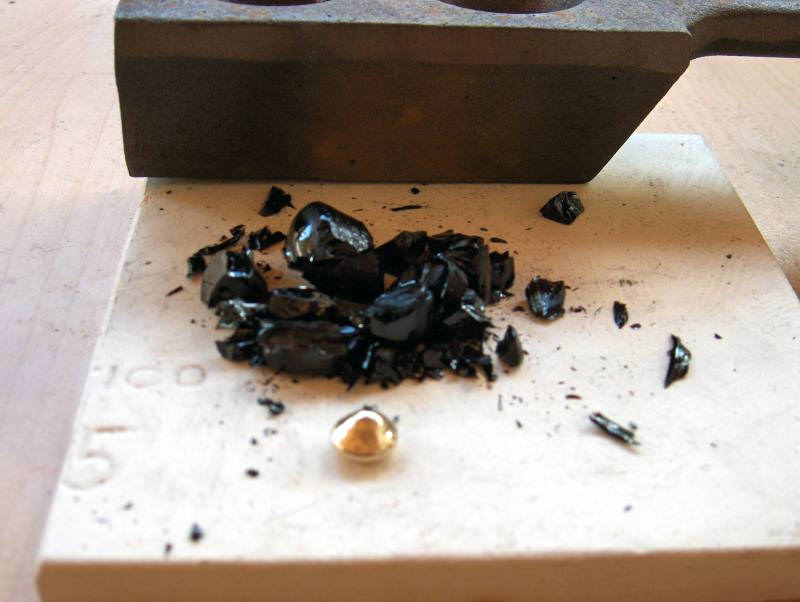 After pouring the molten mixture into the conical mold, the cooling process begins. The molten flux is actually a form of borosilicate glass and, during the cooling process, the glass will shrink and crack. Often times during the cooling period, small shards of glass will fly outward from the cooling mass in the mold with high velocity, as well as from the small amount of flux coating the inside of the crucible. These flying pieces of glass obviously present a hazard when within range of them. Always wear safety goggles and your protective clothing while in the immediate area of the cooling mold and crucible. After the mold and the borosilicate glass have cooled, invert the mold and the conical shaped glass will drop out of the mold. The smelted metal “button” will be on top of the conical shaped glass. In my experience, the glass splinters shooting from the “button” and glass can occur at any time until the metal “button” is completely free of the glass. So, it’s also a good idea to wait on taking family pictures until after the cooling process is complete. In other words; keep everyone, pets included, out of your play area. I hold the metal “button” in my gloved hand and tap the glass on the button with a suitable tool to remove the glass from the button. Once again; always wear your goggles and protective clothing when working with the glass and metal “buttons” until the buttons are free of the glass. After pouring the molten mixture into the conical mold, the cooling process begins. The molten flux is actually a form of borosilicate glass and, during the cooling process, the glass will shrink and crack. Often times during the cooling period, small shards of glass will fly outward from the cooling mass in the mold with high velocity, as well as from the small amount of flux coating the inside of the crucible. These flying pieces of glass obviously present a hazard when within range of them. Always wear safety goggles and your protective clothing while in the immediate area of the cooling mold and crucible. After the mold and the borosilicate glass have cooled, invert the mold and the conical shaped glass will drop out of the mold. The smelted metal “button” will be on top of the conical shaped glass. In my experience, the glass splinters shooting from the “button” and glass can occur at any time until the metal “button” is completely free of the glass. So, it’s also a good idea to wait on taking family pictures until after the cooling process is complete. In other words; keep everyone, pets included, out of your play area. I hold the metal “button” in my gloved hand and tap the glass on the button with a suitable tool to remove the glass from the button. Once again; always wear your goggles and protective clothing when working with the glass and metal “buttons” until the buttons are free of the glass.
 After I have cleaned the “button” and am finished with the glass, I like to break up the glass and inspect it carefully for any small metallic beads or slivers of metal that didn’t pour out of the melt. In my experience, if you are following the directions given here, there should be very little, if any remaining metal beads in the flux. However, stuff happens and if something was not quite right, or the flux was thick and viscous during the pour, ultimately nothing need be lost. I’ll save that glass and when I get enough of it, I’ll crush it to minus 10 mesh, using a mortar and pestle. I’ll then pan the glass down to a concentrate, then dry it, charge a crucible with the glass concentrates and a 1 oz. shot glass of flux, fire the mixture in the kiln and viola, problem solved. After I have cleaned the “button” and am finished with the glass, I like to break up the glass and inspect it carefully for any small metallic beads or slivers of metal that didn’t pour out of the melt. In my experience, if you are following the directions given here, there should be very little, if any remaining metal beads in the flux. However, stuff happens and if something was not quite right, or the flux was thick and viscous during the pour, ultimately nothing need be lost. I’ll save that glass and when I get enough of it, I’ll crush it to minus 10 mesh, using a mortar and pestle. I’ll then pan the glass down to a concentrate, then dry it, charge a crucible with the glass concentrates and a 1 oz. shot glass of flux, fire the mixture in the kiln and viola, problem solved.
FREE MILLING GOLD & SILVER ORES
Yes, I know they’re rare and that a lot of the ore can be worth several times spot price, as specimen material. However; I have found gold and silver ores in old abandoned mines and mine dumps that were nothing much to look at, that were very high grade. For instance, I know of an old mine in Nevada that select ore samples assay from 350 to 500 ounces per ton in silver that are nothing much to look at. I’ve also run across gold ores that as¬sayed over 2 ounces of gold per ton that you can’t see the gold in as well. Basically you can treat these free milling ores the same as the black sand concentrates and recover the metals from them. Obviously the ore needs to be finely crushed and panned down to a concentrate before firing them in the microwave kiln. The ores need to be “free milling” and in an oxidized state for the best results.
I start with a 1 part dry ore concentrates and add 4 parts of the flux mixture, to charge the crucible. The ore concentrates can contain more impurities than the black sand concentrates and can be more difficult to work with, however, with experimentation, they can be smelted. There are different mixtures of fluxes that can be used, as well as processes that can be used for high grade sulfide ores. We won’t go into those processes at this time, however if you want to contact us regarding these practices, feel free to and we’ll help you tailor a process and flux for your ore.
SCRAP GOLD OR SILVER JEWELRY, BULLION, COINS, ETC.
Yes, you can smelt scrap gold or silver jewelry, etc., in your microwave kiln. The flux included in the kit makes this possible. Warning: Do not get into your wife’s or girlfriend's jewelry box, looking for something to smelt, without their knowledge; they remember EVERYTHING that’s in there regardless of what you may believe!
 Your old wedding rings, coins and old jewelry are fair game. I melt a lot of the old silver coins that I find metal detecting, if they’re all crapped up and not worth anything over spot. I do the same with the old crapped up gold and silver jewelry that I find as well. Save the stones, smelt the rest. The purpose of the flux during the smelting process is to hold the impurities contained in the mixture being smelted in suspension and to protect the crucible during the firing process. When firing the black sands concentrates, the iron oxides, etc., are held in suspension by the flux, so that the precious metals can be separated and poured into the mold as liquid metal. Scrap gold and silver jewelry, etc., actually contain much smaller amounts of impurities compared to an ore or black sand concentrate, therefore the amount of flux necessary is much less overall. I’ve had great success using the following recipe: Your old wedding rings, coins and old jewelry are fair game. I melt a lot of the old silver coins that I find metal detecting, if they’re all crapped up and not worth anything over spot. I do the same with the old crapped up gold and silver jewelry that I find as well. Save the stones, smelt the rest. The purpose of the flux during the smelting process is to hold the impurities contained in the mixture being smelted in suspension and to protect the crucible during the firing process. When firing the black sands concentrates, the iron oxides, etc., are held in suspension by the flux, so that the precious metals can be separated and poured into the mold as liquid metal. Scrap gold and silver jewelry, etc., actually contain much smaller amounts of impurities compared to an ore or black sand concentrate, therefore the amount of flux necessary is much less overall. I’ve had great success using the following recipe:
1. 1 oz. shot glass of flux added to the crucible.
2. Scrap gold and or silver placed on top of the flux up to 3 ounces.
3. 1 oz. shot glass of flux poured on top of the scrap gold or silver. Place the kiln into the microwave and microwave on high power for 35 to 45 minutes. I use a two depression conical mold and the above recipe will completely fill one of the depressions with the metal and molten flux. As with the black sand concentrates, your experimentation will ultimately determine the best recipe for your use, when smelting scrap gold and silver. I’ve been able to re-use the crucible several times when smelting scrap gold and silver. Since there are few impurities contained in the scrap, the process is much “friendlier” to the crucible. Always inspect your crucible carefully after each firing for erosion or cracks prior to reusing the crucible.
CARE FOR THE FOLLOWING
• KILN -The kiln included in the kit is constructed of a high temperature aluminum/silicate fiber board that has been coated with a silica based rigidizer at the factory to improve the compressive strength of the fiber board and to minimize the potential of dusting. Treat your kiln with respect and be gentle with it. Don’t toss it in the back of the pick-up and expect it to arrive at your destination undamaged. It’s a good practice to wear a dust mask when you’re working with the kiln and the provided flux, as the dust from both are hazardous. Be sure to maintain good ventilation in the workspace where you are using the microwave kiln.
• KILN SHELF - Any moisture absorbed from the atmosphere will affect it, so keep your kiln shelf dry and protected from moisture at all times. Also: due to the high temperatures achieved in this microwave process, all kiln shelves will eventually crack due to thermal shock and you may notice a small hairline crack after using it. This is cosmetic only and does not affect the structural integrity of the shelf, as it is thicker than necessary and is well supported by the layer of kiln material beneath it. Even if the shelf were to break completely in two, it would still be safe to use, with caution.
• MOLD - Always pre-heat the cast iron conical mold, to drive off any moisture, before pouring into it and to prevent HOT splatters from occurring. Always wear protective clothing and eye protection when pouring the crucible into the mold. Always wear your protective equipment and goggles when working with the cooling or cold borosilicate glass, as well as the buttons, after they have cooled and are coated with glass. Most of us are ugly enough without losing an eye or imbedding shrapnel into our skin.
• FLUX - Keep the flux stored in a dry and safe location, away from children and pets. The flux contains several ingredients that you don’t want to eat or inhale. Wear your dust mask and gloves when mixing the flux and concentrates together. There’s enough bad stuff out there without breathing this stuff or wearing it.
• CRUCIBLES - Store all crucibles in a dry area and make sure crucibles are completely dry. The slightest bit of moisture can cause a crucible to crack upon heating. It is highly recommended to “season” them before use: First, heat the empty crucible inside the kiln in microwave for 15 minutes. Remove the kiln and crucible from the microwave and allow it to cool. Repeat this process again for 15 minutes the second time. This drives off any moisture in the crucible. Your crucible is now ready to receive its first charge. This procedure should be followed for ALL new crucibles and for any crucible that may have been exposed to humid conditions in storage. Once again; you’ve got a lot of time and effort in your concentrates, so don’t skip this procedure. Cracked crucibles and their spills are no fun to clean up.
IMPORTANT SAFEGUARDS
• Keep your workspace free of flammable materials.
• Do not use the microwave kiln in the house. The temperatures achieved during the process are in excess of 230 Fahrenheit and the danger of fire is too much of a risk. Also: there are fumes coming off of the crucible during the process that can be hazardous if not properly ventilated.
• Allow at least 1 inch space between the top of the kiln and the ceiling of the inside of your microwave oven.
• Allow the microwave to cool at least 20 minutes between firings.
• Keep microwave door open between multiple firings, for effective cooling. Always remove the kiln from the microwave after firing, to prevent heat from building up in the microwave and damaging it.
• Do not try to heat a crucible in the microwave alone, without Ceramic Fiber Kiln in place around it.
• Do not leave microwave unattended while the smelling process is underway.
• Immediately turn off the microwave if any sparking occurs or if a crucible breaks. If you cannot reach the control pull the plug.
• Allow the microwave and kiln to cool before trying to deal with any type of spill.
• Always clean microwave after use.
• Do not attempt to fire materials other than listed in these directions.
• Use common sense during this process, always wear your protective gear and the world will be great.
DISCLAIMER
No guarantee is given on the amount of gold or silver obtained from this process, as it depends upon the quality of your material to begin with. The kiln is not a toy and is not to be used by children. IT IS A KILN THAT ULTIMATELY GENERATES TEMPERATURES IN EXCESS OF 2300 DEGREES! Please do not allow small children in the same room when you are firing! Use at your own risk and follow all recommended and common-sense safety precautions! Seller is not responsible for accidents or injuries caused by hot kilns and your using one purchased from us acknowledges that you use it at your own risk. Please remember that a traditional kiln is composed of fireproofed materials and a microwave oven is made of materials that can burn under certain conditions.
SIMILAR PRODUCT
PORTABLE GPK GOLD KIT KWIK KILN
|